FreshByte -Creating a New Vendor
Creating a new Vendor in FreshByte
A Vendor Master file is required for each Vendor. Vendors must be entered in the Vendor Master before a Purchase Order can be entered. Vendors must be created in the system for all expenses for the company. This includes Inventory Purchases, supplies, and all regular expenses (electric, insurance, etc.)
To create a Vendor
- Go to Vendors ‐> Vendors
- Select NEW
- Enter a Vendor ID (maximum of 6 characters, alpha‐numeric, and no special characters)
Enter the Vendor name.
These are the only entries required to save the Vendor and create a Purchase Order; however, it is recommended to enter as much information as possible.
The following is a list of the suggested entries as well as other possible options.
Additional Vendor Master Settings
Although not required, the following options are important to consider when setting up a Vendor. These items can be changed at any time.
- Contact Information ‐ complete as much contact information as possible, including email addresses.
- Tax ID – This is important if the Vendor will receive a 1099 at year’s end.
- Remit to – Used if the remit to information is different from the Vendor Name and/or address
- Net Due Days
- Payment Discount Days – The number of days in which a discount is received upon payment of the invoice.
- Payment Discount Percentage – The discount percentage that will be received if the invoice is paid within the payment discount days.
- Credit Limit – The amount of credit granted by the Vendor
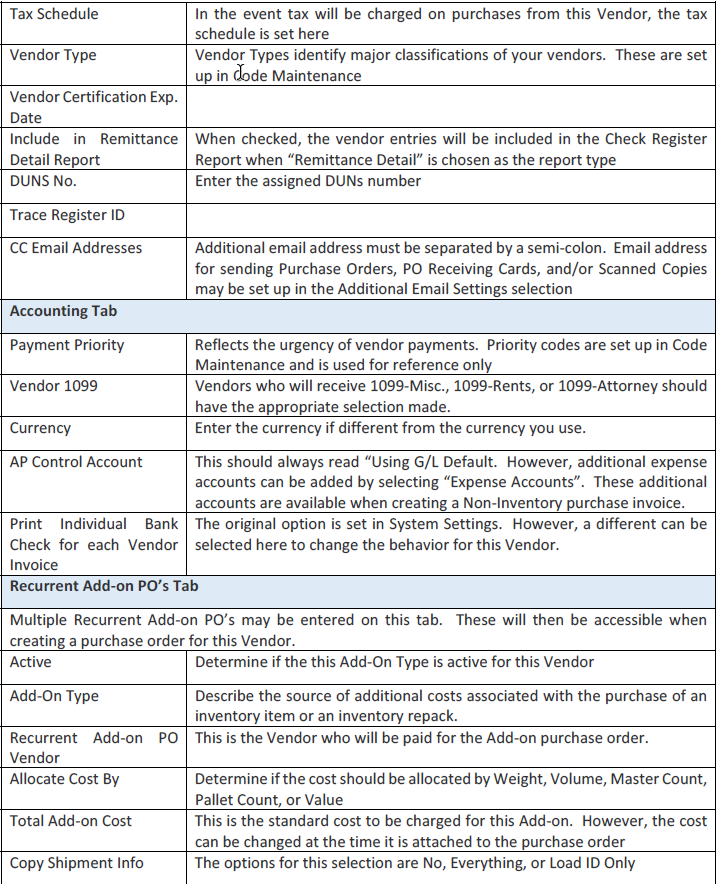
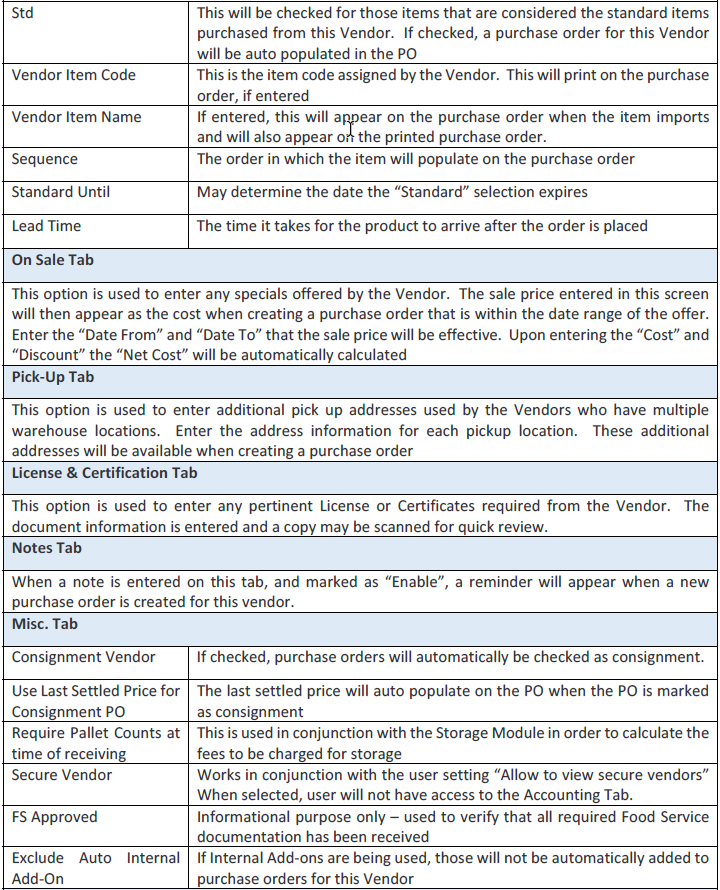
Optional Vendor Master Settings
The following is an extensive list of the remaining options and settings available on the Vendor Master along with a brief description of each.


Related Articles
Maintaining Vendor Expense GL accounts for Payables. Adding and Removing GL accounts
FreshByte offers a feature to store GL expense accounts that are used on Vendor Payable Invoices for regular expenses. The following instructions outline how to delete an incorrect GL expense account from a Vendor Invoice or add GL expense accounts ...Inventory -Item Master How to Create Items in FreshByte
Inventory Item Master FreshByte Software is dependent on the company setting up Inventory Items within the system for any item that the company would like to track. This includes both Inventory Items sold as well as supply items used in the packaging ...AP Suspense
On an add-on PO, if the font on the line is red, that indicates the line has been invoiced. When a line remains in black font, that line was not included in any payable invoice and therefore remains on the AP Suspense report until invoiced. It is ...FreshByte Prospective Customer Feature
FreshByte includes a feature to manage prospective customers. The feature allows users to enter prospective customer information, maintain information for follow-up, and send a pricelist from the system utilizing a current active customer. Setting up ...FreshByte AR Customer/Payment Refund Import
FreshByte provides a powerful feature that allows users to directly import customer payments into the Payment/Refund Center. This feature seamlessly integrates corporate payments, open receipts, and credits, which can then be assigned to specific ...